Spam is one of the things any site owner should be mindful of when managing his or her site. That’s why most bloggers don’t like the idea of putting a chatroom on their sites – because it’s one of the easiest way to letting spam in. However, this is not the case with Chatwing chat software. The chatting tool is capable enough to fend itself against users who would like to exploit the chatroom.
Chatwing’s efficiency doesn’t stop there. It has a lot of features that compliment it, providing an even better service via live chat. And despite its excellent chatting capabilities, Chatwing remains affordable enough for everyone to be able to use it – it’s free. So if you’re planning on embedding a chatroom on your site, then you should pick Chatwing.
Embedding it is very easy. Below is a guide in creating a Chatwing chatroom and embedding it on your site.
Step 1: Registration
The first step is getting a Chatwing account. Chatwing’s registration process is very simple, so even if this part is necessary, there’s no need to worry about being held up here. You can finish the entire process in less than a minute.
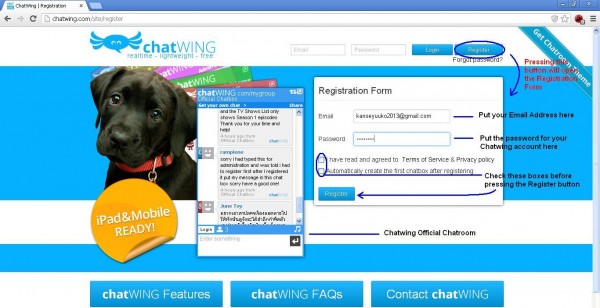
To register, go to Chatwing’s homepage and open the registration form. Fill in the blanks with your email address and the password of your account. Check the boxes below it and submit it by pressing the Register button at the bottom of the form. Now, let’s go to step two.
Step 2: Creating the Chatroom
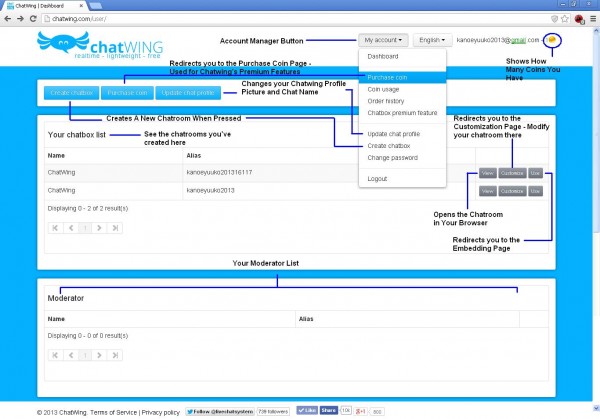
Chatwing allows you to make multiple chatrooms per account and you can see all of them here, in the Dashboard page. They’ll be lining up in the Chatroom list, which is empty for now aside from the one that has been automatically created when you registered. To create a new chatroom, press the Create chatbox button. It’ll create a chatroom and redirect you to the next page at the same time.
Step 3: Modifying the Chatroom
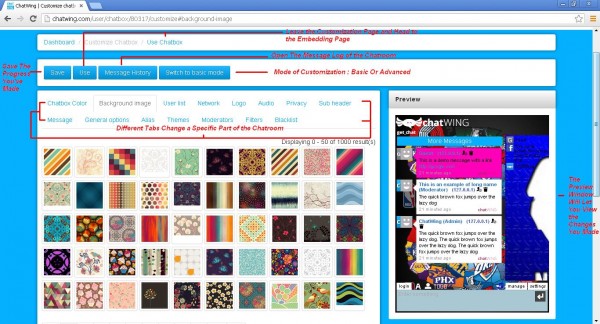
The Customizing page is where you modify the chatroom you have. The customization options inside it vary in numbers, depending on which mode you’re using. Basic mode has seven tabs in all while the Advanced mode has fifteen. To alternate between them, press the Switch button on the top of the page.
Each tab has specific customization settings that you can change easily and each one will modify a certain part of the chatroom. Some even has Chatwing’s additional functions. You need to set these up too, if you want to utilize them. In a nutshell, customizing your chatroom can increase its effectiveness as a chatting tool drastically compared to the default chatroom you had at first.
As you browse through the tabs, you might see some Save buttons. You need to press these buttons on the tabs which has them in order to save the changes you’ve made on that tab. You can see all of the changes you’ve made so far on the preview window. Press the Use button on top of the Customization page once you’re done customizing.
Step 4: Embedding the Chatroom
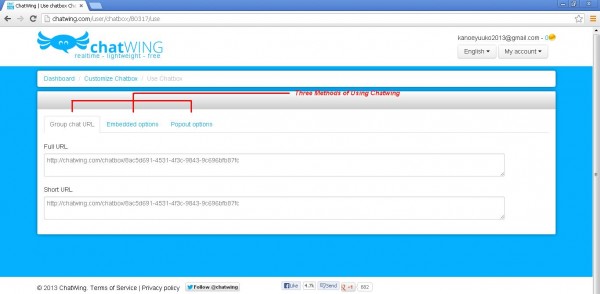
After customizing, the chatroom is now ready to go. There are three methods of using the chatroom you have now, and in the Embedding page, you are to choose one. The best option would be Embedded Options, so pick that.
Step 5: Embedded Options
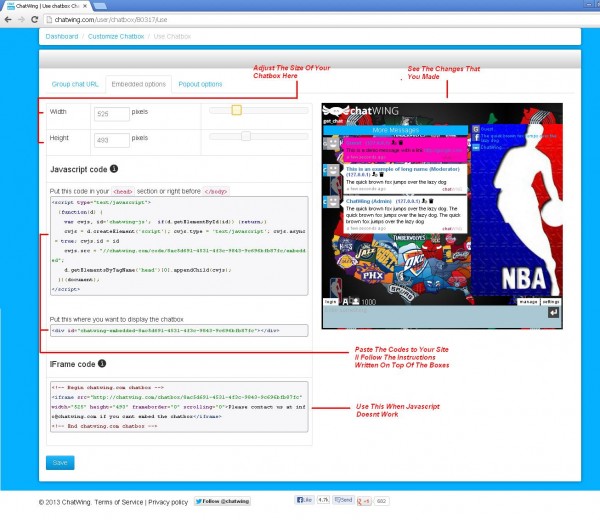
In this tab, you’ll make the final preparations for your chatrooms before embedding it. You can still change its size here if you want too, using the height and width scrollbars supplied inside it. There’s still preview window here, so you can see the changes you’ll make.
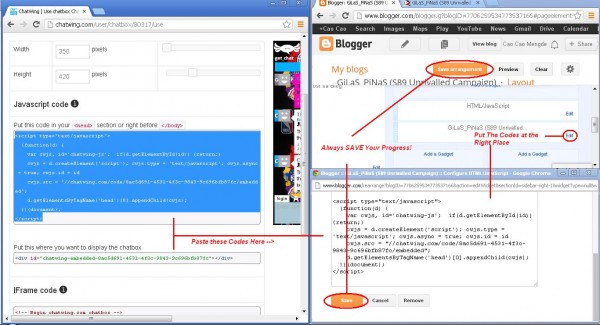
If you believe that the chatroom is ready to be embedded, scroll down below the tab for its HTML codes. Inside Javascript, there are two sets of HTML codes. Open your site to the part where you want to place the chatroom. Highlight codes, one set at a time, and paste them there.
Close your site after saving it and open it again. The chatroom should be online now, right where you want it to be.
Note: There are some cases in which sites don’t execute Javascript codes. If the chatroom doesn’t show up on your site, just replace the codes you pasted with the iFrame codes, also found in the Embedded Options tab. That should make quick work of the problem.
Using the Chatroom
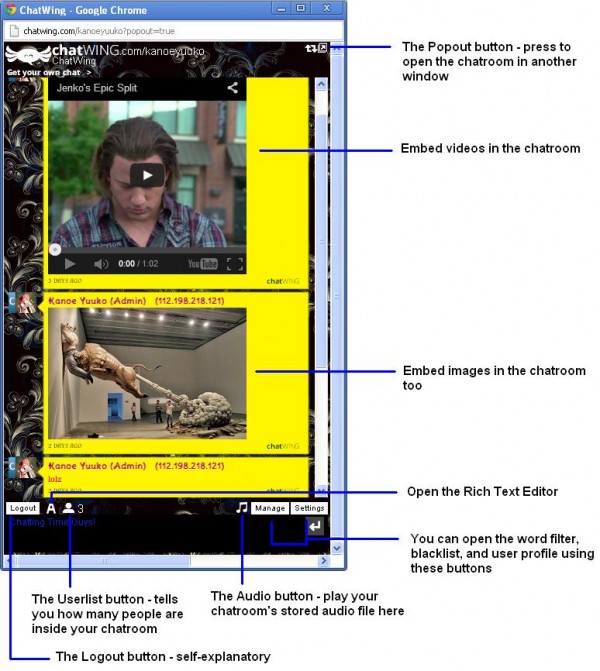
Since you own the chatroom, you have to responsibly manage it – especially since it’s already part of your site. Don’t worry about anything though. Because managing it is very easy, thanks to Chatwing’s exceptional features.
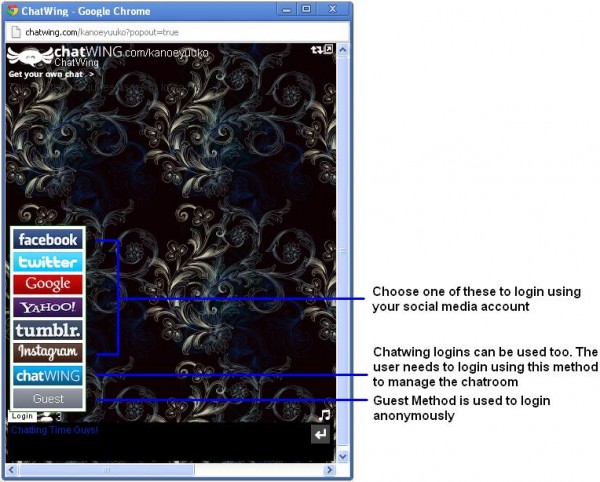
Your chatters can easily join in with the conversation by using their social media accounts. Chatwing currently accepts Facebook, Google, Twitter, Yahoo, Tumblr and Instagram as its newest addition to the allowed login methods via social media networking sites.
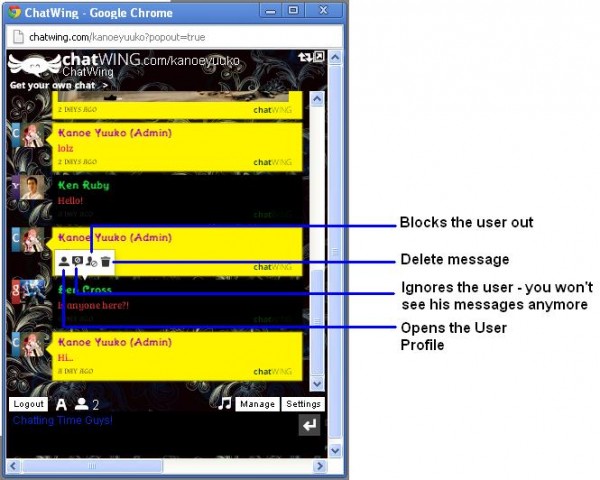
Chatwing has very efficient security functions too. As the Administrator, you can ban anyone, especially spammers. Setting the length of the interval between messages sent in the chatroom is also an option that can be changed to further enforce anti-spam. Lastly, you can delete any messages in the chatroom or delete all the messages a certain person has sent with one click.
These controls can be given to your moderators too, but only if you permit it. You can also set up word filters that will censor words like profanity, even in the chatters usernames. With all these functions and more, Chatwing can surely support your site with ease.

